There are many aspects to a knife that influence its overall performance. And behind every exceptional blade lies a rigorous process of testing and evaluation. The tests ensure that it meets the exacting standards of sharpness, hardness, edge retention, rust resistance, and more.
In this article, we delve into the methodologies employed to assess these critical characteristics. Shedding light on the intricate science and artistry of knife testing as presented by the esteemed purveyors of craftsmanship here at LeeKnives. Let’s get started now!
Testing edge angle
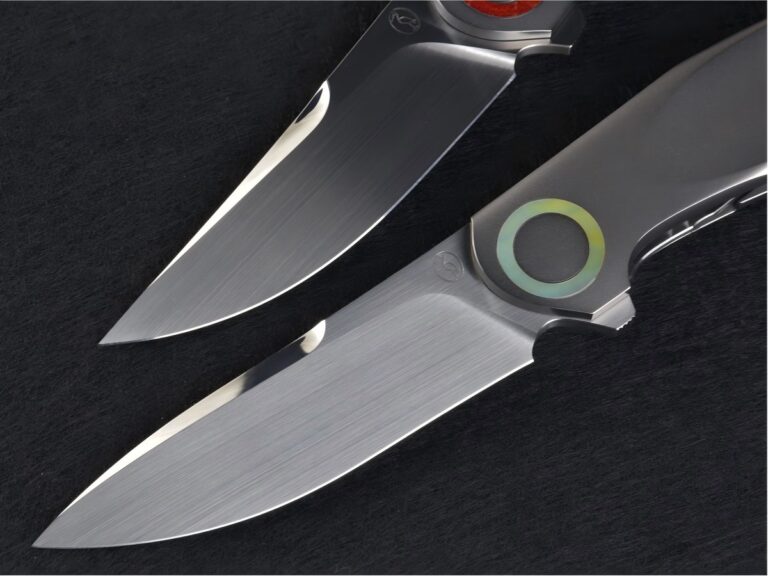
A knife bevel refers to the angled edge that is ground into the blade to form the cutting edge. It is the part of the blade that comes into contact with the material being cut. The bevel can vary in angle and shape, depending on the intended use and design of the knife. Different bevel angles can affect the knife’s cutting performance, durability, and ease of sharpening.
Goniometer
To test bevel angles or edge angles, you need a laser goniometer. There are many models of goniometer made with the intent to test edge angles. The preeminent and highly regarded contenders are predominantly monopolized by Catra—a renowned company in this specialized domain. Which is also the one we used (the Laboratory Laser Goniometer) to test each knife produced by us.
Process
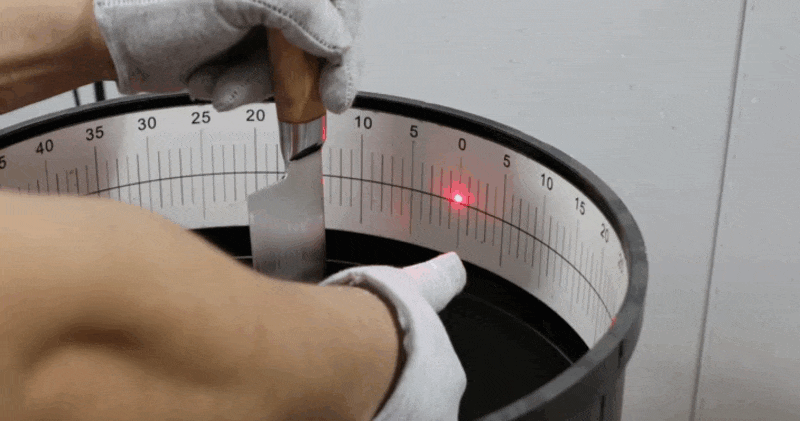
The process of measuring the angle with the goniometer is rather simple:
- Position the blade in close proximity to the goniometer’s central axis.
- You’ll see a low-powered, red laser beam emitting. Align the red dot as close to the zero degree mark as possible.
- The laser will then show the result of the bevel angle. By reflecting converging onto a graduated circle akin to a protractor. This circle, adorned with etched markings indicative of various angles.
Result
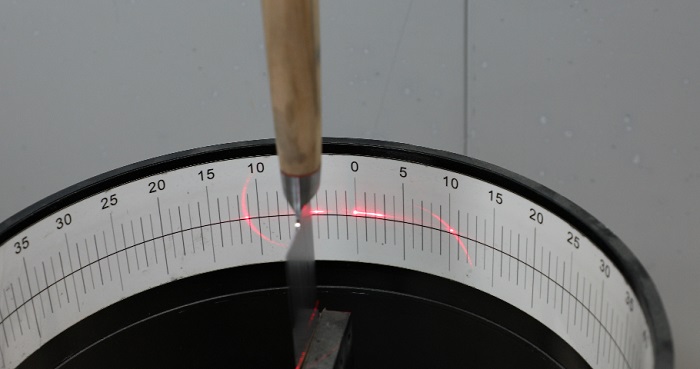
The precision of this process is truly remarkable, consistently yielding results within an impressive margin of ± ½°, impeccably calibrated to intervals of ½°.
When the goniometer assesses a knife with a simple, flat grind, the result appears as two dots that mirror each other and represent the same angle number. However, for knives with more complex grinds, like a convex grind featuring an extra angle alongside the apex one, the goniometer projects a narrower laser line that moves closer to the zero mark. This shift indicates the main angle, providing insight into the blade’s unique grinding design.
Buy Wholesale Knives and Start Scaling up with Us Today
Contact us and connect with a sales rep to get a free quote.
Testing hardness
For many readers, hardness is the part they’re most eager to learn about in this article. It’s what most customers expect to see when they purchase a knife, making it a key aspect of knife testing.
Checking a knife’s hardness is not just about putting up a number in the product description. It’s also a way to make sure the earlier heat treatment was done right.
If the knife has a subpar hardness, it needs to be re-heat treated by quenching or adjusting other processes. Suspiciously high hardness is questionable as well. Really hard knives can sometimes lack toughness, which means they might not be as durable as they should be. The knife only yields the best property when they are in their optimal hardness range.
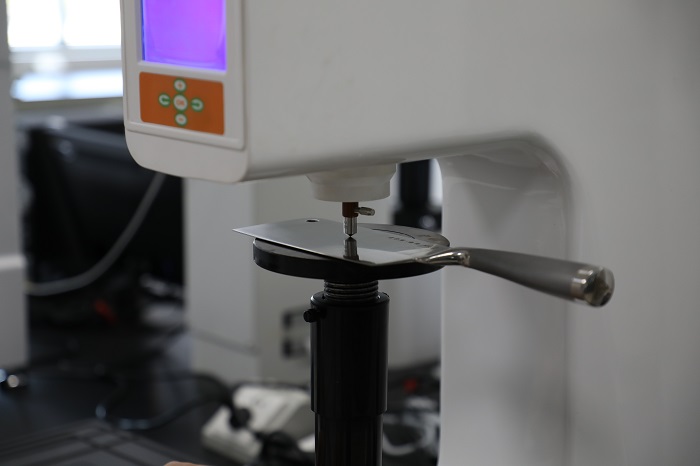
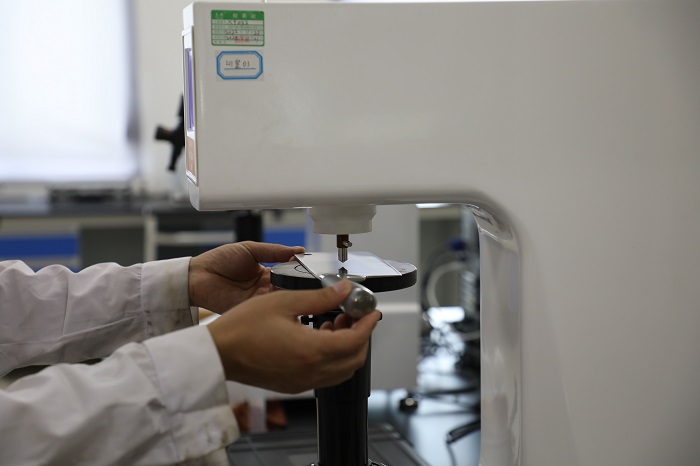
Rockwell hardness tester
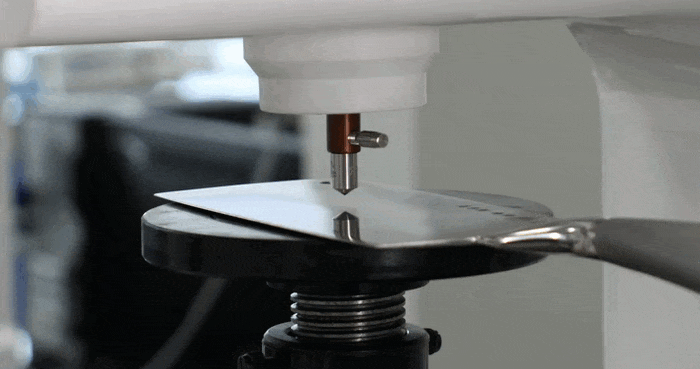
The tool we use to test hardness is called the Rockwell hardness tester. The Rockwell hardness tester applies an indentation force to the material being tested and measures the depth of penetration to determine its hardness value. The device consists of a load application system, an indenter (typically a diamond cone or a hardened steel ball), and a depth-measuring system.
Process
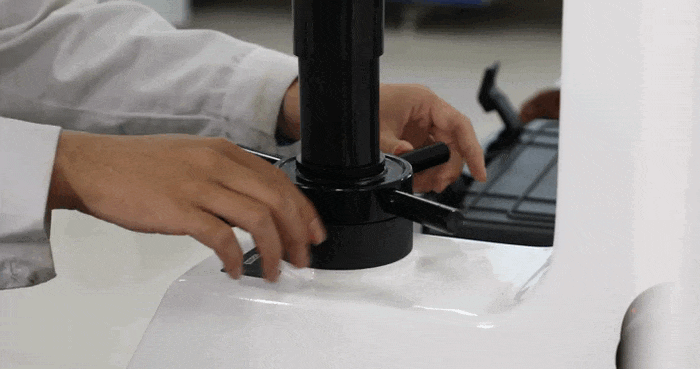
- Place the blade onto the surface. The subject should be absolutely flat and clean in order to get the most accurate result.
- Slowly rotate the helm at the bottom of the base clockwise to lower the indenter, making it penetrate the blade.
- Keep lowering the indenter until the machine lets out a crisp beep sound. Stop rotating immediately, and wait for the result.
- The machine will start measuring. The Rockwell hardness value is determined based on the depth of penetration and the specific Rockwell scale being used. The hardness value is indicated on the screen above, corresponding to the specific scale (e.g., HRC, HRB, etc.).
Result
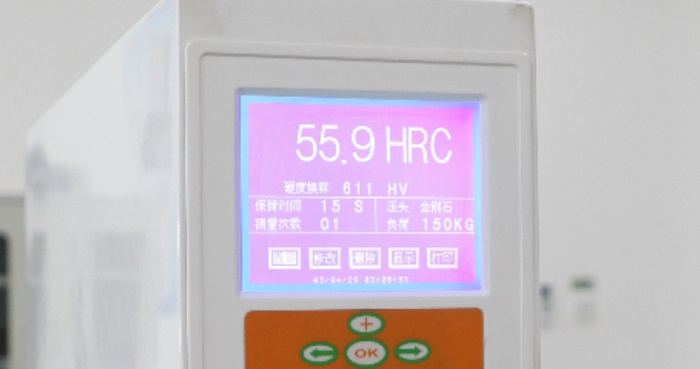
Rockwell hardness scale is the most common unit to identify knife steel hardness. When a knife’s hardness is between HRC 45 and the low-50s, we see it as being on the softer side. Any steel that’s higher than the mid-50s is seen as hard. However, once it goes beyond 60, that’s when we label it as very hard.
There are other hardness scale standards. It’s important to note that specific models of Rockwell hardness testers may have additional features, automation, or variations in the testing procedure.
Testing sharpness and edge retention
Unlike hardness, which becomes fixed after the completion of heat treatment, a knife can lose its sharpness gradually through regular use over time. That’s why how long the blade retains its edge is also a big part of a knife’s quality. In this test, we assess both the initial sharpness and the blade’s edge retention simultaneously.
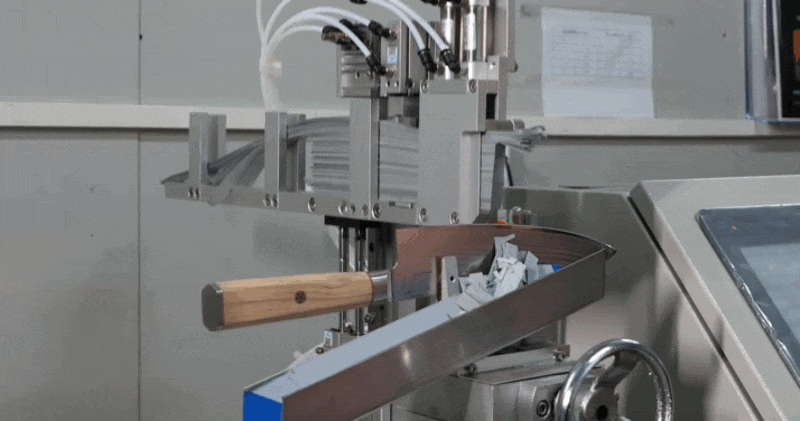
The sharpness and edge retention tester
To conduct the sharpness and edge retention test, we use the device followed by the standard of ISO, or the International Organization for Standardization’s document ISO 8442-5:2004.
During testing, special equipment is used to imitate how a knife cuts. This is done to mimic real-life situations. The test is done many times, with each round making the test blade cut at the same angle and force. This repetitive testing helps us see how well the blade keeps its sharpness and stays effective while pretending to be used as it would be in real situations.
The process
- Prepare a set of testing papers in 10 mm onto the machine.
- Position the blade inside the machine. Set the blade in a way that its cutting edge is facing up.
- Once the knife is secured, the machine will move the blade back and forth while bring the testing paper down onto it. The blade cuts through the paper, and we measure the results.
Result
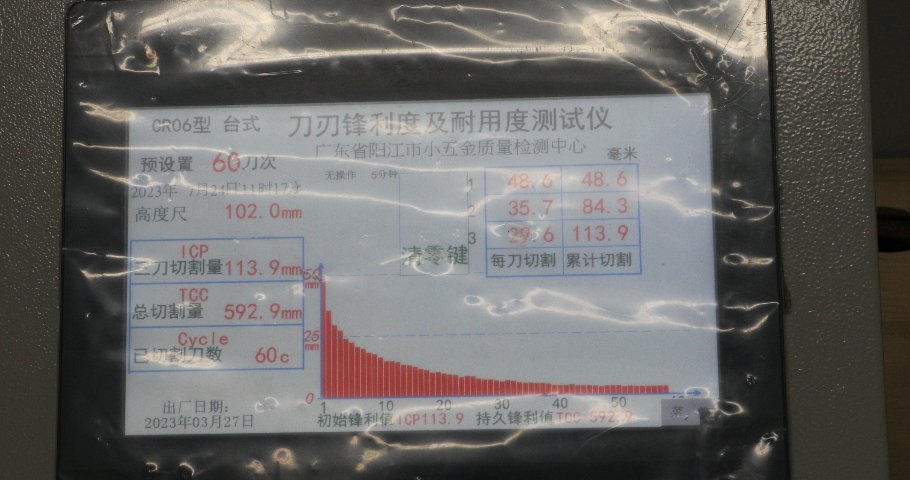
To figure out how sharp a knife is, we add up how much paper it cuts during the first 3 rounds of testing. According to ISO standards, a good sharpness level for a knife is around 50mm of paper cut. However, it is expected for the Initial Cutting Performance (ICP) result to be higher.
Scoring edge retention is done by counting the total paper cuts throughout the whole test, which covers more than 60 rounds. To be considered as having decent edge retention, a knife should achieve a minimum of 150 Total Card Cuts (TCC). This measurement helps us understand how well the knife holds its edge for repeated use.
| Initial sharpness ICP (mm) | Edge retention TCC (mm) | ||
| < 50 | Poor | < 150 | Poor |
| 50 – 80 | Fair | 150 – 280 | Fair |
| 80 – 100 | Good | 280 – 370 | Good |
| 100 – 110 | Great | 370 – 500 | Great |
| > 110 | Excellent | > 500 | Excellent |
Buy Wholesale Knives and Start Scaling up with Us Today
Contact us and connect with a sales rep to get a free quote.
Testing rust
Rust is something steel can’t avoid, even if it’s stainless steel – It’s just a matter of time before it happens. That’s why it’s crucial to check how well the steel can resist rusting for as long as it can before they were put on the shelf.
Salt spray test
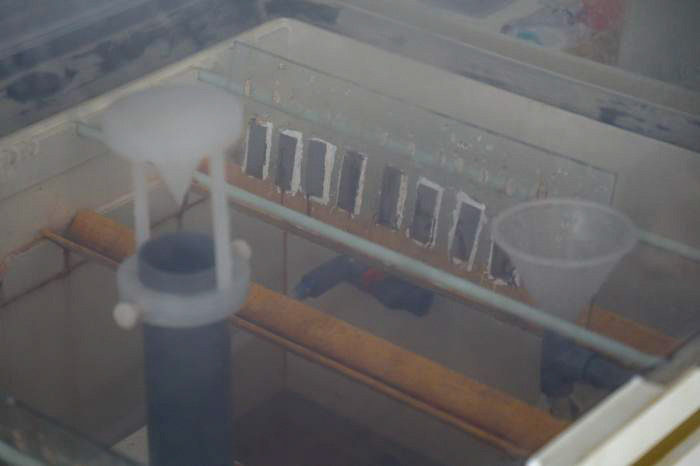
To check for rust resistance, we use a method known as the salt spray test or salt fog test. This method is widely accepted for testing corrosion in knife blades. It’s a commonly used and standardized approach that’s relatively straightforward to conduct, with well-defined standards in place.
Salt spray test applies to multiple standards across different materials. For example, ASTM B117 is the first internationally recognized salt spray standard, initially published in 1939. Different types of raw steel, or blades that have been heat-treated require different standards and methods during the test. ASTM G50, for example, is a common standard for knives.
Process
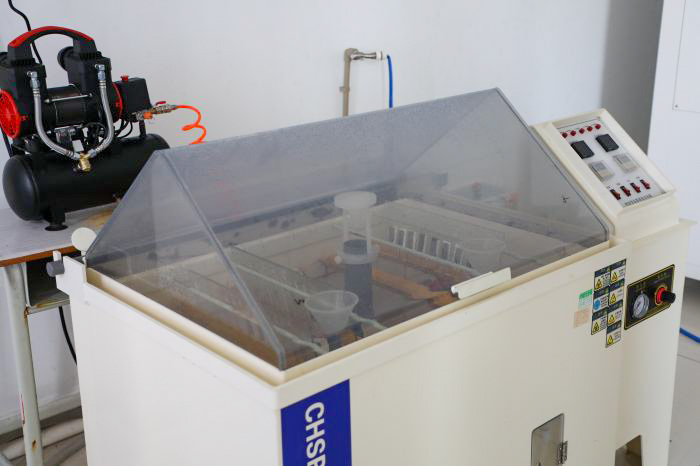
The principle of the test is quite simple. But first you need to understand that rust begins to develop when steel is consistently exposed to sulfur dioxide and carbon dioxide found in water and air.
In the salt spray test, we manage these variables by placing knife blades inside a sealed environment and filling it with humid air containing salt particles. These salt particles form a fog that settles on the knives and within the chamber. This setup simulates the conditions that accelerate corrosion.
By observing how long it takes for the knife to corrode, we gauge its rust resistance. A longer duration of resistance indicates better performance.
Wrapping up
Now that you’ve got a grasp of how knife testing operates, it plays a crucial role in ensuring top-notch quality, especially when working on new blade designs.
Should you have any further inquiries regarding the intricacies of knife testing, please feel free to reach out. We’re here to assist you in seizing business opportunities and providing valuable insights. Don’t hesitate to get in touch with us to request a quote or to discuss any opportunities working with LeeKnives.