This guide covers how fixed-blade knife handles are attached to blades, the different assembly methods used in manufacturing, and what holds a knife handle together.
It applies to kitchen knives, survival knives, tactical knives, and traditional Japanese knives. For folding knives, the construction revolves around pivots and liners — a separate topic.
What Are the Parts of a Knife Handle?
Before choosing an assembly method, it helps to know the components involved. A typical knife handle includes:
| Part | What It Is | Why It Matters |
|---|---|---|
| Tang | The blade steel that extends into the handle | The structural backbone; determines strength and balance |
| Scales | The two handle panels (on a two-piece design) | The visible grip surface; defines aesthetics and feel |
| Pins / Rivets | Metal fasteners holding scales to the tang | Provide mechanical clamping; also decorative |
| Bolster | The thick junction between blade and handle | Adds balance and acts as a finger guard |
| Butt / Pommel | The rear end of the handle | Counterbalance; sometimes used for lanyard attachment |
| Liner (folders) | Internal metal plates inside folding knives | Provides structure for locks and pivots |
For a complete breakdown of all knife parts, see our knife parts guide.
How Are Knife Handles Attached?
A knife handle is not simply “glued on.” In manufacturing, handle attachment is a two-step decision:
- How the handle is secured to the tang — the assembly method
- What covers the tang — the coverage type
A full-tang chef’s knife with G10 scales and brass pins is built completely differently from a paring knife with a hidden tang and an injection-molded plastic handle. One requires machining, manual assembly, and finishing. The other relies on a steel mold and automated overmolding.
At LeeKnives, we classify handle construction across 6 assembly methods and 4 coverage types. Understanding this framework helps buyers match manufacturing choices to cost, durability, and design goals.
What Holds a Knife Handle Together?
The short answer: it depends on the knife. Here is a quick-reference matrix showing which assembly methods pair with which coverage types in real production:
| Assembly Method | Two-piece Scale | One-piece Handle | Partial Coverage | Naked Tang |
|---|---|---|---|---|
| Riveted | Western chef knife standard | — | Traditional Japanese wa-handle | Full-tang outdoor knife |
| Screwed | Serviceable EDC/tactical | — | — | — |
| Bolted | Heavy-duty survival knife | — | — | — |
| Injection Overmolded | — | Mass-market kitchen/utility | — | — |
| Adhesive Bonded | Seamless premium kitchen | Hidden tang custom | — | — |
| Hybrid Fixation | High-end laminated | — | Japanese ho-wood wa-handle | — |
Blank cells indicate combinations that are either mechanically unsound or commercially non-viable.
6 Handle Assembly Methods Explained
1. Riveted (Pinned)
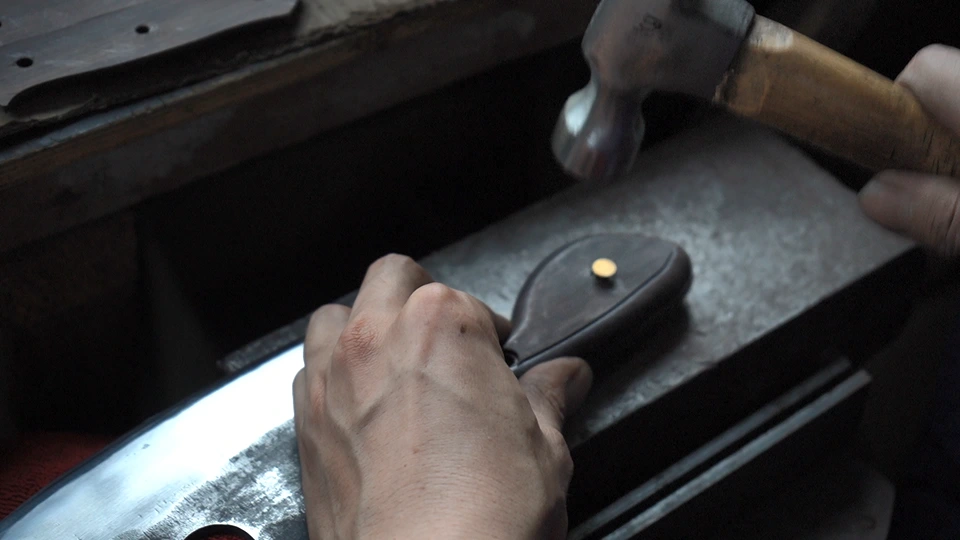
What it is: The most traditional method. Metal pins or tubular rivets pass through aligned holes in the tang and handle scales, then are expanded and ground flush.
How it works: The tang and scales are drilled using CNC fixtures to ensure alignment. Pins — typically brass, stainless steel, or nickel silver — are pressed in with a riveting machine. The ends are sanded flush with the handle surface.
Why it matters: Rivets create a permanent bond. Consumers associate visible rivets with quality, which is why most premium kitchen knives use this method.
Pros & Cons
| Pros | Cons |
|---|---|
| Permanent bond — handle will not loosen | Cannot be disassembled for repair |
| High perceived value — signals craftsmanship | Requires precise drilling; misalignment is visible |
| Low tooling investment | Slower than automated methods |
| Works with almost all scale materials | Harder to achieve fully waterproof seal vs. injection |
Best Tang Types
| Tang Type | Suitability | Why |
|---|---|---|
| Full Tang | ★★★ Ideal | Full-width tang provides maximum surface for pin clamping; alignment is straightforward |
| Partial Tang | ★★☆ Possible | Less surface area means fewer pin positions; still viable for shorter knives |
| Hidden / Rat-tail Tang | ★☆☆ Rare | Requires one-piece handle or blind pinning; rivets are usually not visible from outside |
B2B Insight: Riveted assembly sits in the middle of the cost spectrum — higher than injection molding, lower than bolted or hybrid. For mid-to-premium kitchen knives, the perceived quality boost usually justifies the extra labor. Tooling is minimal (riveting dies are inexpensive), but labor intensity is moderate due to drilling, pinning, and flush grinding.
Best for: Full-tang kitchen knives, traditional Western chef knives, and mid-to-premium EDC where “permanent” construction signals quality.
2. Screwed (Mechanical Fasteners)
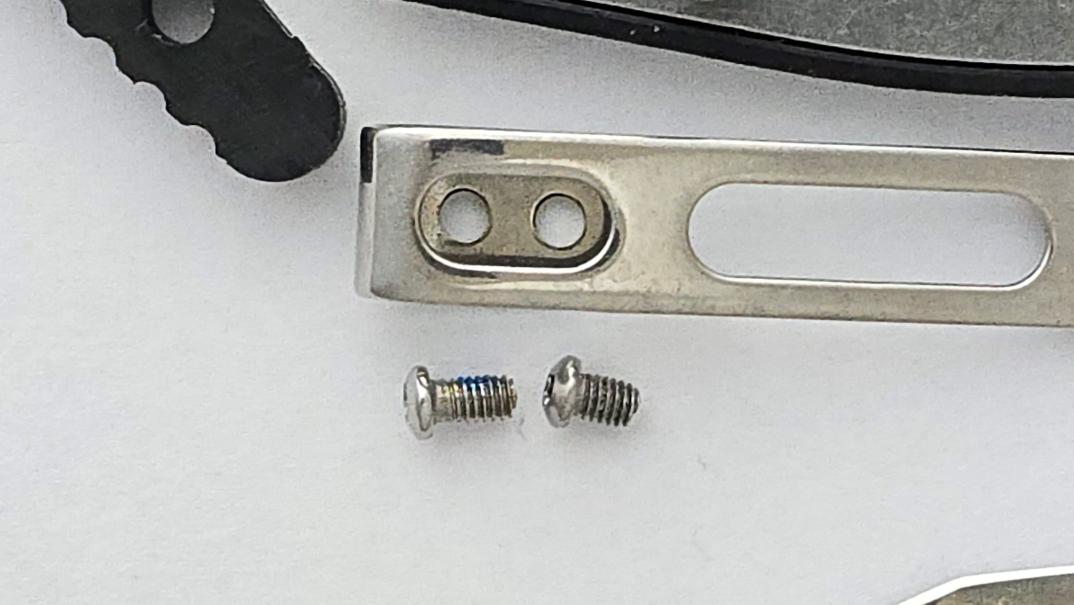
What it is: Threaded screws pass through the scales and tang, allowing the handle to be removed for maintenance or replacement.
How it works: Screws — typically Allen-head or Phillips machine screws — thread into tapped holes in the tang or into threaded inserts. A drop of thread-locking compound prevents loosening under vibration.
Why it matters: Unlike rivets, screws can be removed. This is a selling point for tactical and EDC knives where users may want to customize scales.
Pros & Cons
| Pros | Cons |
|---|---|
| Serviceable — scales can be replaced | Requires torque control; overtightening cracks scales |
| Strong mechanical clamping | Threads can strip in soft materials or under abuse |
| Lower tooling cost than bolts | Visible screw heads may not suit premium aesthetics |
| Good for hard-use knives that need field maintenance | Threadlocker adds a process step |
Best Tang Types
| Tang Type | Suitability | Why |
|---|---|---|
| Full Tang | ★★★ Ideal | Full-width tang provides ample material for tapped holes or threaded inserts |
| Partial Tang | ★★☆ Possible | Limited thickness may require threaded inserts rather than direct tapping |
| Hidden / Rat-tail Tang | ☆☆☆ Not suitable | Narrow tang cannot accommodate through-screws |
B2B Insight: Screwed handles require torque-calibrated assembly to prevent cracked scales or stripped threads. Factories without calibrated drivers often over-torque, especially in wood or G10. Material cost is low, but labor intensity is moderate-to-high due to threading and torque control steps.
Best for: Tactical knives, EDC with swappable scale systems, and any product line where field serviceability is a selling point.
3. Bolted (Through-Bolts)
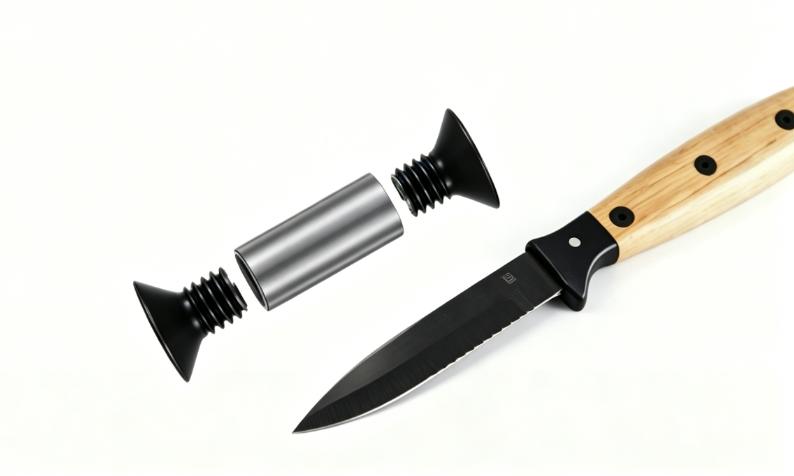
What it is: Heavy-duty bolts — such as Corby bolts or Loveless fasteners — pass through the entire handle and clamp the scales together under high pressure.
How it works: Corby bolts are hollow and threaded internally; the two halves screw together through the tang. The clamping force is several times stronger than equivalent rivets. Bolt heads are countersunk and ground flush for a clean look.
Why it matters: When a knife will be used for batoning, prying, or heavy outdoor tasks, the handle cannot fail. Bolted construction is the strongest mechanical method available.
Pros & Cons
| Pros | Cons |
|---|---|
| Highest mechanical clamping force of all methods | Highest labor and material cost among mechanical options |
| Serviceable with the right tools | Requires countersinking — adds machining step |
| Premium aesthetic when ground flush | Corby bolts require inventory or custom turning |
| Superior durability under impact and torsion | Over-torquing can deform scales |
Best Tang Types
| Tang Type | Suitability | Why |
|---|---|---|
| Full Tang | ★★★ Ideal | Full-width tang distributes bolt clamping force evenly across scales |
| Partial Tang | ★☆☆ Challenging | Narrower tang reduces clamping footprint; may need washers |
| Hidden / Rat-tail Tang | ☆☆☆ Not suitable | Too narrow to accommodate through-bolts |
B2B Insight: Many mid-tier factories do not stock Corby bolts and may substitute standard screws unless explicitly specified. If your product requires through-bolts, specify the fastener type in your technical package. Durability is highest, tooling cost is low, but material cost and labor intensity are both high.
Best for: Premium survival knives, custom chef knives, and any application where handle security is non-negotiable.
4. Injection Overmolded
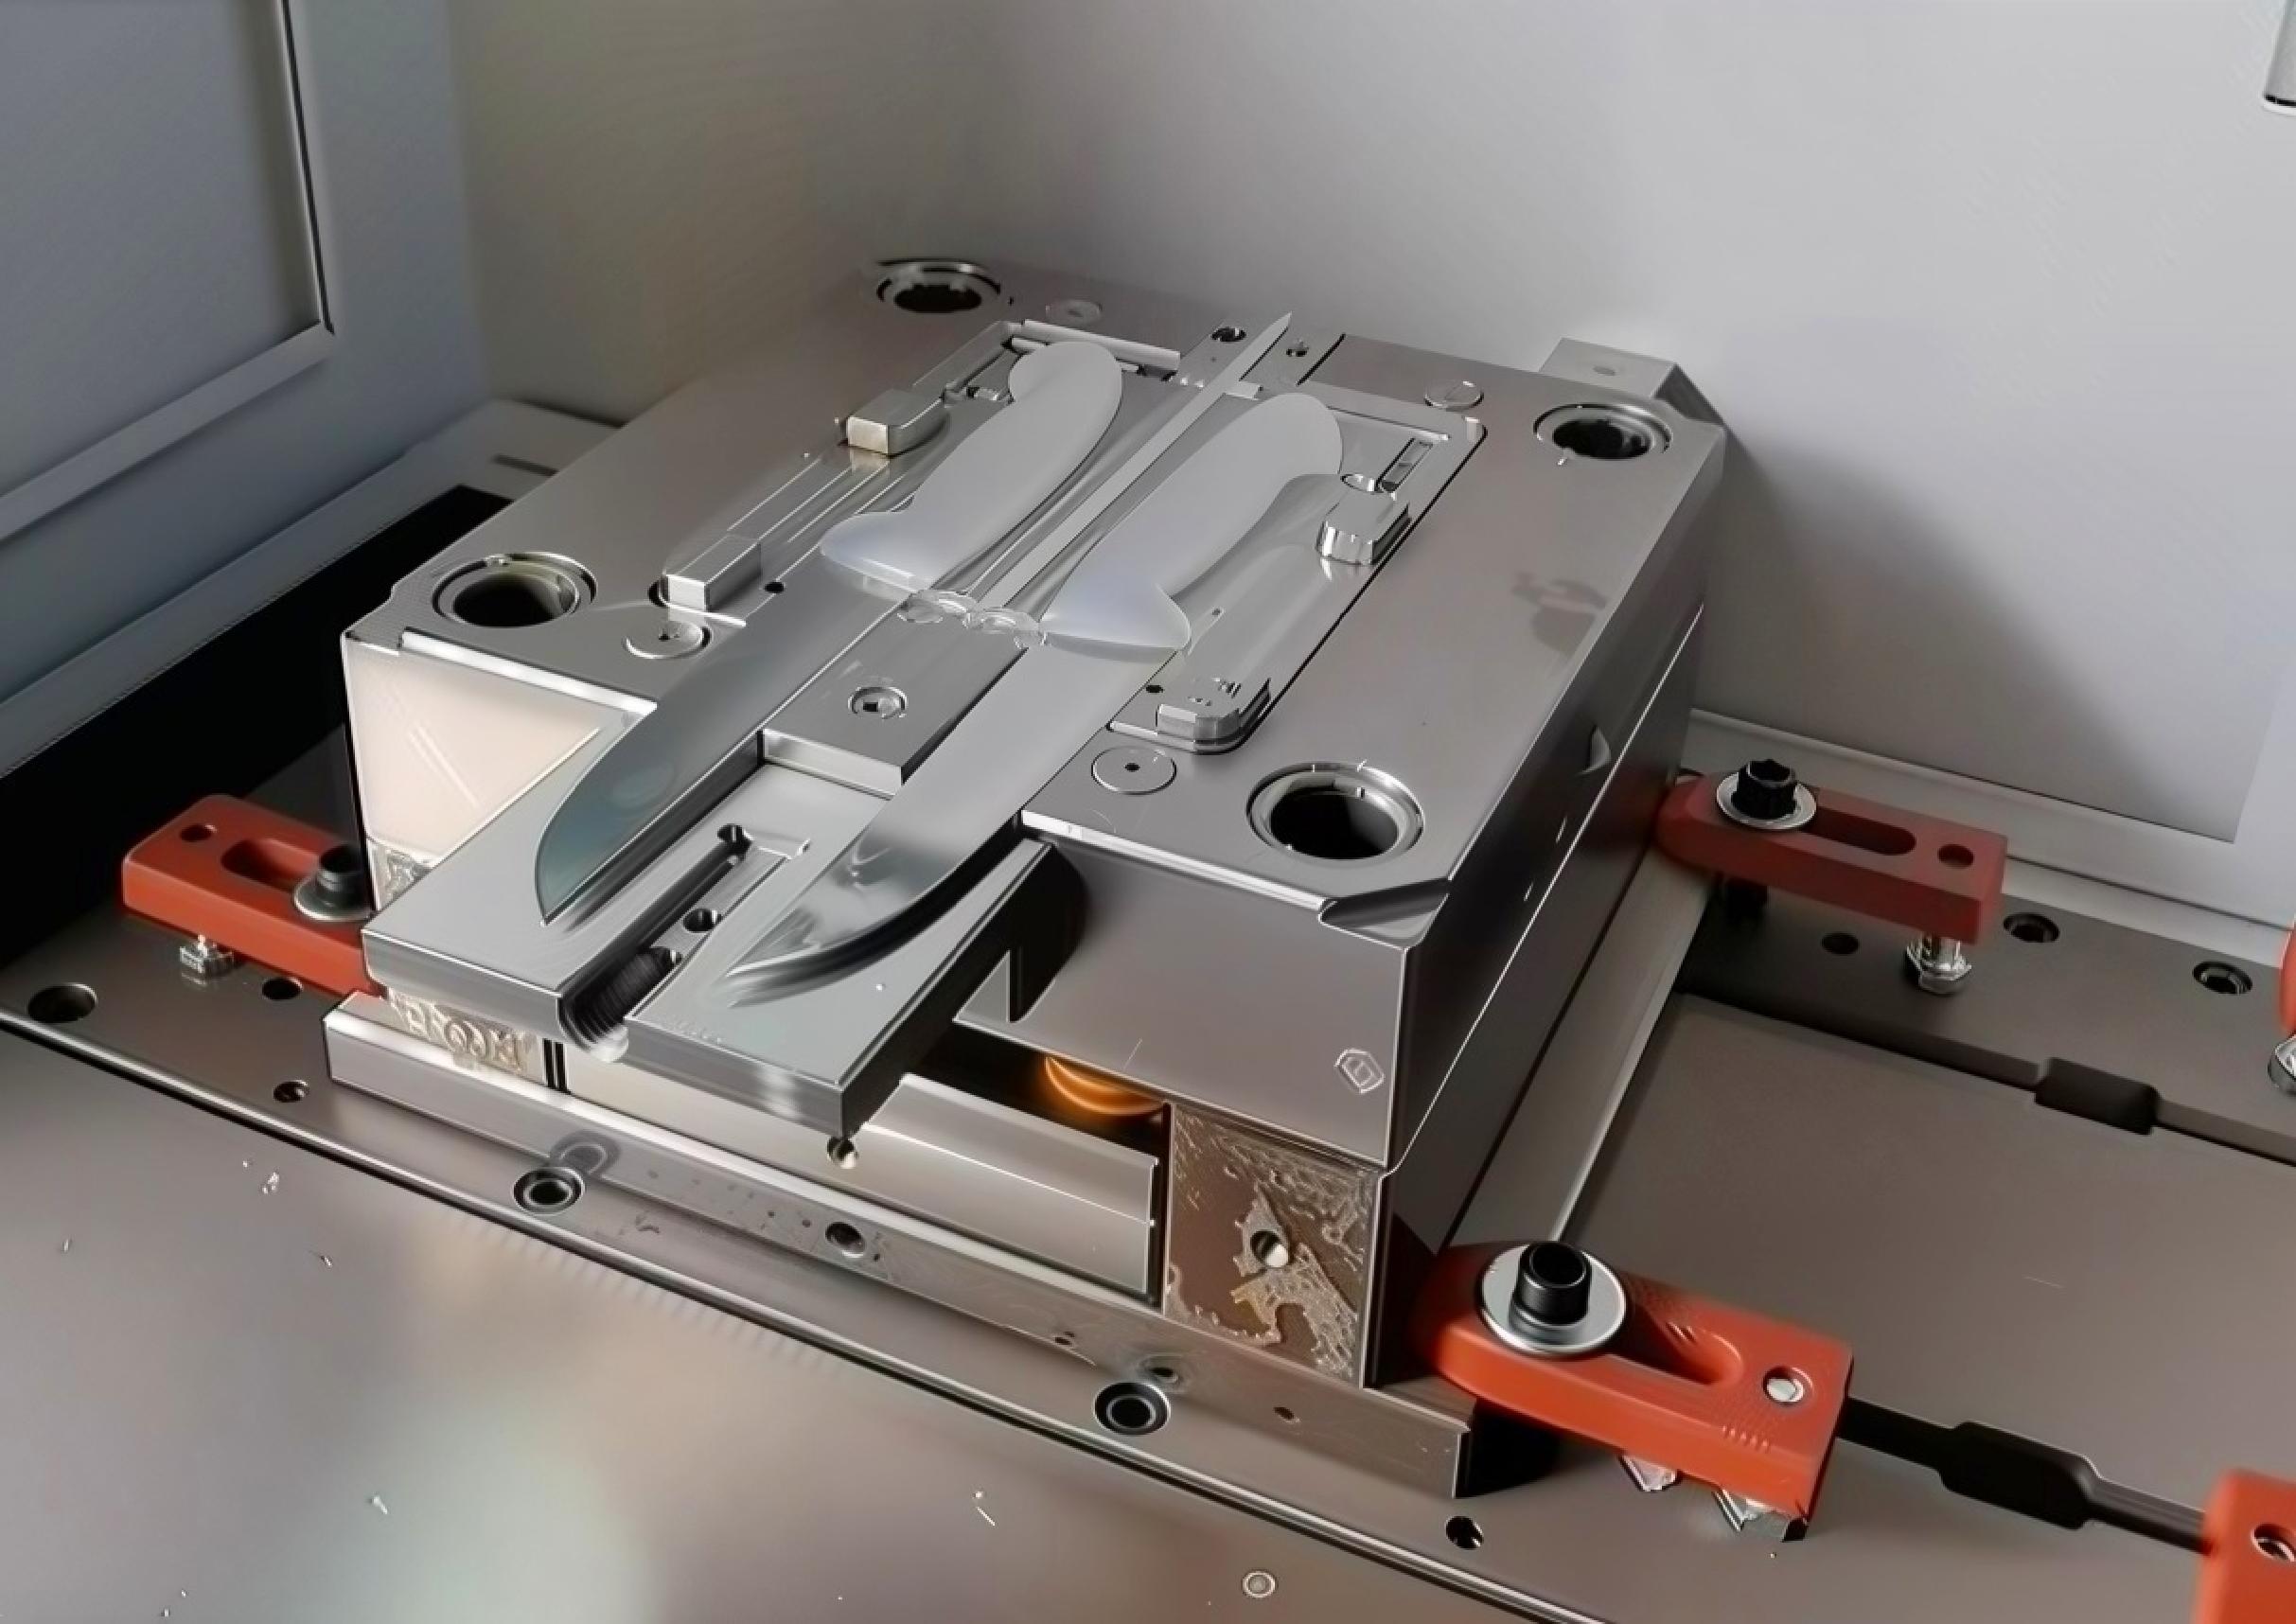
What it is: Molten polymer is injected around the blade tang inside a steel mold, forming a seamless, one-piece handle.
How it works: The blade is placed in an injection mold. Molten plastic — usually PP, ABS, PA6 (nylon), or glass-reinforced nylon (FRN) — is injected at high pressure and cools around the tang. The result is a handle that is chemically and mechanically bonded to the blade.
Why it matters: This is the fastest and cheapest method at scale. Once the mold is cut, cycle times are under a minute and labor per unit is minimal.
Pros & Cons
| Pros | Cons |
|---|---|
| Lowest unit cost at volume | High upfront mold investment |
| Fastest production cycle | Poor mold = flash, sink marks, tang exposure |
| Seamless waterproof seal | Material limited to polymers (no wood, G10, Micarta) |
| Consistent shape and weight | Not viable for small batches |
| Zero visible fasteners | Harder to repair or replace |
Best Tang Types
| Tang Type | Suitability | Why |
|---|---|---|
| Partial Tang | ★★★ Ideal | Short tang is easily encapsulated; minimal material waste |
| Hidden / Rat-tail Tang | ★★★ Ideal | Narrow tang reduces shrink-stress and mold complexity |
| Full Tang | ★★☆ Possible | Full-width tang creates large flat surfaces where polymer shrinkage can cause warping or delamination; requires careful mold design |
B2B Insight: The upfront mold cost is the main barrier. For orders below roughly 5,000 units, injection molding rarely pays off compared to mechanical assembly. Above 10,000 units, it becomes the most cost-efficient option. Material cost is very low, labor intensity is very low, but tooling investment is very high.
Best for: Mass-market kitchen knives, commercial food-service knives, budget EDC, and any SKU where low unit cost is the top priority.
5. Adhesive Bonded
What it is: Handle scales are attached using structural adhesive — usually two-part epoxy — with no visible fasteners.
How it works: The tang is sandblasted and degreased. The scales are prepared with light abrasion. High-strength epoxy is applied, and the assembly is clamped under controlled pressure until cured.
Why it matters: No visible pins or screws means a seamless, premium appearance. This is essential for carbon fiber handles, where drilled holes would compromise both aesthetics and structural integrity.
Pros & Cons
| Pros | Cons |
|---|---|
| Completely seamless appearance | Debonding is the #1 failure mode if prep is skipped |
| No stress concentrations from holes | Requires careful surface prep and cure time |
| Works with materials that crack when drilled | Not field-serviceable |
| Excellent moisture seal when done right | Longer production cycle due to curing |
Best Tang Types
| Tang Type | Suitability | Why |
|---|---|---|
| Full Tang | ★★★ Ideal | Large bonding surface area maximizes adhesive strength |
| Hidden / Rat-tail Tang | ★★★ Ideal | One-piece handle or wa-handle block bonded around narrow tang |
| Partial Tang | ★★☆ Possible | Adequate bonding area for shorter knives |
B2B Insight: Debonding (delamination) is the most common handle failure in adhesive-bonded knives. It is almost always caused by skipped surface preparation — not the adhesive itself. Factories that skip degreasing or use bare hands after cleaning create weak bonds. Durability is high when done right, but process control is critical. Material cost is low, labor intensity is moderate.
Best for: Seamless premium designs, carbon fiber or Micarta scales, and hidden-tang construction.
6. Hybrid Fixation
What it is: Any combination of the above methods used together.
Common combinations:
- Rivets + epoxy: The industry standard for high-end full-tang kitchen knives. Rivets provide mechanical security; epoxy seals out moisture.
- Screws + threadlocker + epoxy: Tactical knives that need both serviceability and vibration resistance.
- Burn-in fit + epoxy: Traditional Japanese wa-handles, where a heated tang is pushed into wood and backed up with modern adhesive.
Why it matters: A single method always has a weak point. Hybrid methods cover each other’s gaps — mechanical fasteners prevent adhesive creep, while adhesive prevents moisture ingress and vibration loosening.
Pros & Cons
| Pros | Cons |
|---|---|
| Highest overall durability and reliability | Most labor-intensive and costly |
| Combines strengths of multiple methods | More process steps = more quality checkpoints needed |
| Reduces warranty claims and returns | Not cost-effective for budget lines |
| Allows design flexibility (e.g., visible rivets + hidden epoxy) | Longer production time |
Best Tang Types
| Tang Type | Suitability | Why |
|---|---|---|
| Full Tang | ★★★ Ideal | Ample options: rivets+epoxy, bolts+epoxy, screws+threadlocker+epoxy |
| Hidden / Rat-tail Tang | ★★★ Ideal | Burn-in + epoxy + bamboo pin is the traditional Japanese standard |
| Partial Tang | ★★☆ Possible | Typically adhesive + light mechanical backup |
B2B Insight: Hybrid methods add cost but dramatically reduce return rates. For premium lines, the extra assembly time is usually recovered through lower warranty claims and higher customer satisfaction. Durability is the highest of all methods, but both labor intensity and material cost are high.
Best for: Any knife where failure is not an option — premium kitchen, tactical, or survival applications.
At-a-Glance: Assembly Method Comparison
Use this table for quick decision-making:
| Method | Best Tang Type | Cost Level | Labor Level | Durability | Perceived Value | Serviceable |
|---|---|---|---|---|---|---|
| Riveted | Full Tang | Medium | Medium | High | High | No |
| Screwed | Full Tang | Medium | Medium-High | Medium-High | Medium | Yes |
| Bolted | Full Tang | High | High | Very High | Very High | Yes |
| Injection | Partial / Hidden | Very Low | Very Low | Medium | Low | No |
| Adhesive | Full / Hidden | Low-Medium | Medium | High (if prep is right) | High | No |
| Hybrid | Full / Hidden | High | High | Very High | Very High | Varies |
Cost and labor levels are relative comparisons at production volumes above 1,000 units. Injection molding has very low unit cost but very high upfront tooling investment.
How to Choose the Right Assembly Method
| Your Priority | Best Method | Best Coverage | Typical Product |
|---|---|---|---|
| Lowest unit cost | Injection overmolded | One-piece | Supermarket kitchen knife |
| Fastest production | Riveted | Two-piece scale | Standard chef knife |
| Maximum durability | Bolted + epoxy hybrid | Two-piece scale | Survival/bushcraft knife |
| Field serviceability | Screwed | Two-piece scale | Tactical/EDC knife |
| Seamless aesthetics | Adhesive bonded | Two-piece scale | Premium carbon fiber handle |
| Traditional authenticity | Burn-in + epoxy hybrid | One-piece (wa-handle) | Japanese deba/yanagiba |
| Highest volume efficiency | Injection overmolded | One-piece | 10,000+ unit retail line |
B2B Procurement Checklist
When evaluating an OEM manufacturer for handle assembly, verify the following:
- Equipment match: Do they have riveting presses for mechanical assembly? Injection machines with adequate tonnage for overmolding? Torque-calibrated drivers for screwed handles?
- Adhesive protocol: For bonded handles, is the full surface-prep sequence followed — degreasing, abrasion, primer, meter-mixed epoxy, clamping, and cure logging?
- Hole alignment control: Are tangs CNC-drilled with pinned templates, or drilled by hand?
- Humidity management: In coastal manufacturing regions, uncontrolled humidity compromises wood handles and adhesive cures. Is the assembly area climate-controlled?
- Pull-test documentation: Can the factory provide shear-test data for adhesive batches?
- Tang prep for injection molding: Are tangs sandblasted and primed before molding, or inserted smooth?
Frequently Asked Questions
How are knife handles attached?
Knife handles are attached using one of six main methods: riveting, screwing, bolting, injection overmolding, adhesive bonding, or hybrid fixation. The right method depends on the tang type, handle material, intended use, and production volume.
What holds a knife handle together?
In most kitchen and outdoor knives, metal pins or rivets hold the handle scales to the tang. In mass-market knives, injection-molded plastic forms a chemical and mechanical bond around the tang. In premium knives, a combination of mechanical fasteners and structural adhesive is often used.
How to attach knife blade to handle?
The blade is not attached to the handle directly — rather, the tang (the extension of the blade steel) is secured inside or against the handle material. Methods include drilling and pinning for full-tang knives, burning-in for traditional wa-handles, or injection molding for one-piece plastic handles.
What are the pins in a knife handle called?
They are commonly called pins or rivets. Materials include brass (decorative, anti-corrosion), stainless steel (structural), and nickel silver (premium). In custom knife making, specialty fasteners like Corby bolts and Loveless fasteners are also used.
How to attach knife scales with pins?
The tang and both scales are drilled with aligned holes. Pins are driven through and expanded mechanically or hydraulically. The ends are then ground flush with the handle surface. For best results, holes should be CNC-drilled with tight tolerances to prevent cracking or misalignment.
How to make a knife handle without pins?
Handles can be attached without pins using adhesive bonding (structural epoxy), injection overmolding, or hybrid methods like burn-in fitting (heating the tang and inserting it into wood). These methods create seamless surfaces with no visible fasteners.
What are different types of pins called?
Common types include: standard pins (solid metal rods), tubular rivets (hollow, expanded), Corby bolts (hollow, threaded, two-piece), Loveless fasteners (hidden bolt + pin combo), and bamboo pins (used in traditional Japanese wa-handles).
What are the components of a knife handle?
The main components are the tang (structural backbone), scales or handle body (grip surface), pins/fasteners (attachment), bolster (blade-to-handle transition), and butt/pommel (rear end). In folding knives, liners and pivot hardware are also part of the handle assembly.
What is a Japanese knife handle called?
A traditional Japanese knife handle is called a wa-handle (和柄). It is typically octagonal, D-shaped, or oval, and uses a hidden tang inserted into a wooden handle block — most commonly magnolia, walnut, or ebony.
How to put a new handle on a knife?
For full-tang knives, remove the old pins (by drilling or grinding), detach the old scales, prepare the new scales with aligned holes, and re-pin or re-glue. For hidden-tang knives, the old handle must be removed carefully, the new handle block drilled or burned to fit, and the tang secured with adhesive or a pommel nut.
What to use for knife handle pins?
Brass is the most common choice for kitchen knives due to its corrosion resistance and gold appearance. Stainless steel is used for structural applications. Nickel silver is preferred for premium knives. The pin diameter is usually 4–6mm for kitchen knives and 5–8mm for survival knives.
What is the back of a knife handle called?
The rear end of the handle is called the butt or pommel. In some designs, it includes a hole for a lanyard. In tactical knives, the pommel may be reinforced for striking.
Need Help Specifying Your Handle Assembly?
Choosing the right handle assembly method is only one part of bringing a knife to market. At LeeKnives, we help brands make the right manufacturing decisions — from tang geometry and handle materials to assembly methods and QC protocols — based on your target price, volume, and durability requirements.
Whether you need 200 units of a riveted G10 survival knife or 50,000 injection-molded commercial kitchen knives, we control the full production process in Yangjiang and can advise on the most cost-efficient assembly method for your SKU.
Contact us for a custom knife manufacturing quote.
- Parts of a Knife: Complete Anatomy Guide — Hub page with handle assembly overview
- Full Tang vs Partial Tang — Tang structure deep dive
- Guide to Knife Handle Materials — G10, Micarta, wood, and more
- Knife Handle Designs — Ergonomics and shape
- Japanese Knife Handles — Wa-handle construction